CRM Automations
An automation starts when an event matches its trigger and conditions, then performs an ordered set of actions. Use it for repeatable follow-ups such as adding an activity note or creating a task. For a sequence you start manually, use a Playbook.
Repeating a real action can start a new automation. For example, completing a task, reopening it, and completing it again counts as two completions. Retrying background processing for one saved change does not create another event.
Before you start
Creating or completing a task, or creating or updating a ticket, saves its automation follow-up at the same time. Automations run in the background and retry temporary failures. Your saved change stays successful while processing catches up; you do not need to repeat the update to trigger its automation.
Automations run with the permissions of their original creator. Only that member can edit the executable definition; another member cannot take over its execution identity. You need the relevant CRM permissions and available automation capacity.
Start with a narrow example using demo data. Avoid enabling a broad customer trigger just to produce a test run. The editor does not offer a manual Submit event button.
Create your first automation
- Open CRM → Automations. If it is not in your navigation, open All CRM modules.
- Create a definition and give it a name describing its purpose.
- Choose Trigger type, then configure the event and scope.
- Add Filters if only some matching events should start the automation.
- Add an action, such as Add activity note. Fill in the required values.
- Save the draft. New automations are inactive by default.
- Review the trigger, conditions, and effects. Turn on Enabled and save when you are ready to test it.
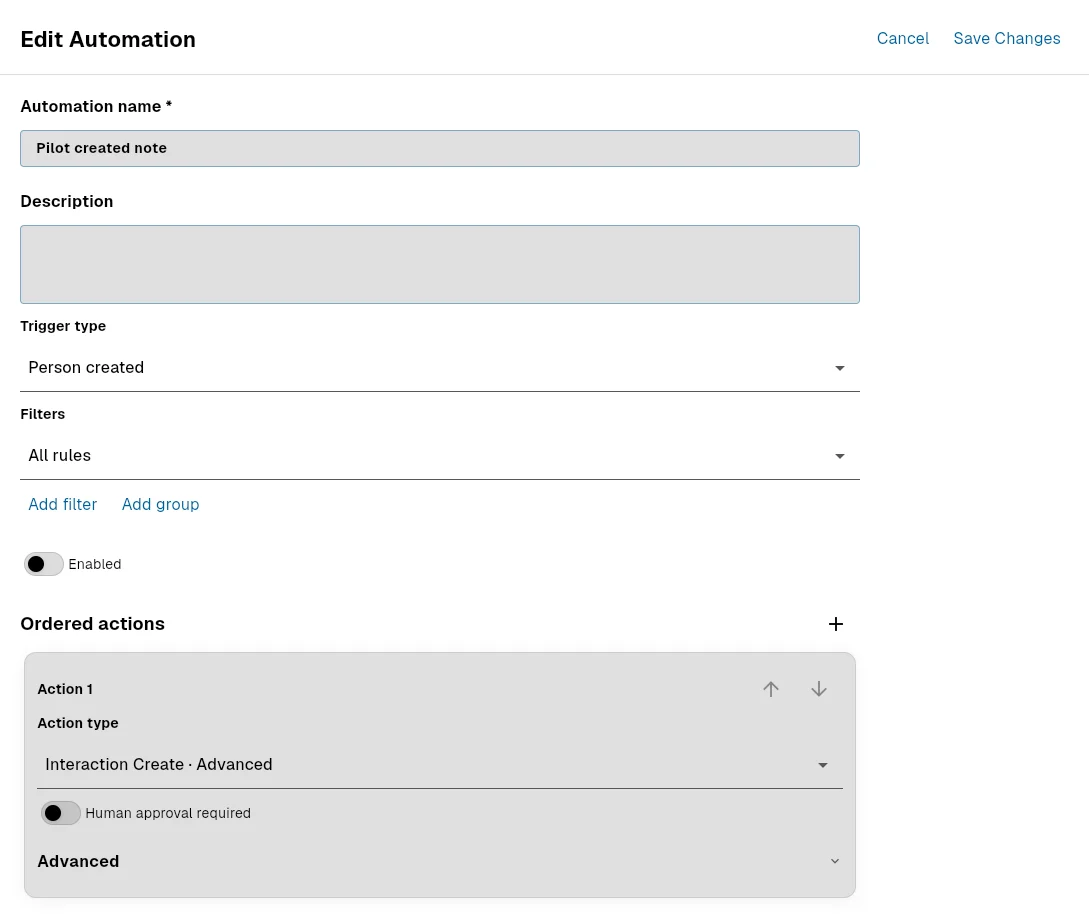
Example from a demo workspace: a Person created event adds a note. App labels follow your selected language.
Editing an existing definition preserves its activation state. Selecting a different trigger changes its settings; switching back during the same editing session restores that trigger's unsaved inputs. Only the selected trigger is saved.
Choose conditions
In Filters, choose whether all or any conditions must match. Available fields depend on the event:
- Customer create/update events expose customer fields.
- Task and Ticket events expose title, status, and priority where supported named options are available.
- Interaction and Signal events expose their summary, type, and source.
- Outcome events expose title and numeric progress.
Choose fields and options by name. Use the input provided for numbers, dates, yes/no values, choices, relationships, or money. Changing a field clears its previous comparison value. For a multiple-choice field, Contains checks one configured option.
Money comparisons use the same currency on both sides; Bnder does not convert currencies. Enter major units, such as 12.50 EUR, using your app language's decimal separator. Excess decimal places are rejected. Different currencies do not match, including for Does not equal.
Add filter group creates nested conditions. Remove filter group removes that group and its rules. Definitions allow up to 100 conditions overall and 50 entries per group. If a picker fails to load, use Retry or reopen it; do not replace saved conditions merely because loading failed.
Existing advanced conditions can remain preserved even when the editor cannot modify them. Ask the person who manages that definition to update those conditions through its existing configuration process.
Schedule an automation
For Date Reached, choose a start date and time. Leave Repeat Interval off for a one-time run, or enter a whole number from 1 to 525600 minutes between runs.
For Entity Date Reached, choose the customer or Record Type and a named date field. Configure minutes before or after that date; zero means at the date itself. If a saved field is unavailable, replace it before saving.
Configure and order actions
Use + to add an action, the arrows to reorder it, and the trash icon to remove it. Selecting the same action type again keeps its inputs; changing the type starts a new configuration for that step.
- Add activity note adds a note to the customer's history.
- Create task needs a project and task title. Task steps link the triggering customer unless their saved configuration explicitly specifies other links or none.
- Wait for approval stops until a decision is made.
- Pause waits for the configured duration.
Required inputs are marked with an asterisk. Validation errors identify the field or step to correct; validation itself does not run the workflow. A failed save keeps your draft open.
Push notifications can address only a current member of the same workspace. Their links must be internal paths, such as /app/. Webhook actions use a managed connection, not an arbitrary destination URL. Automations do not execute custom uploaded code.
Test and inspect a run
- With your narrowly scoped automation enabled, perform the real trigger action using demo data.
- Select Working view → Runs and refresh.
- Open the run to inspect its steps, attempts, status, and activity history.
- Confirm the intended result in the affected record or task.
- Disable or adjust the automation if the result is unexpected. Review the effect before testing again.
Use External actions to inspect work sent to connectors, virtual coworkers, portal publishing, or Playbooks. Filter by status to find waiting or failed actions; All statuses clears the filter.
Disabling or editing a definition affects new runs. An existing run keeps the action version it started with. Cancellation cannot undo an external action already sent.
Approve, pause, retry, or cancel
Run details show the actions available for the current state. Approval and rejection buttons are below the step details; scroll within the history on a short screen.
Only the current step of a run waiting for approval can be decided. Resume a paused run first. Approving an old step cannot restart a cancelled run.
A retry of resumable failed work preserves completed steps rather than repeating successful actions. If another action changed the run, refresh before trying again. A waiting run shows its deadline; Execute now is unavailable before that time. Pausing and resuming does not restart the original wait duration.
Troubleshoot
| Symptom | What to do |
|---|---|
| The definition will not save | Correct the highlighted fields or retry from the open editor. |
| A list, picker, or history fails to load | Use its Retry or Refresh action. Reloading history does not run the automation again. |
| A new run stays pending | Ask your administrator to check the CRM background workers. Repeated starts can create additional runs. |
| A run fails because access changed | Have the creator's required permissions corrected, then retry the eligible failed run. |
| A notification cannot be delivered | Check that its recipient still belongs to the workspace and its link is an allowed internal path. |
| A loop or execution limit stops work | Inspect the log and correct the workflow before retrying. |
While a command is pending, wait for its result. Switching workspaces does not cancel an already submitted save or command; return to the original workspace and refresh to check the outcome.
Related guides
- Playbooks for manually started sequences.
- Forms for customer submissions that can trigger work.
- Connectors for managed external actions.