Webhook Logging
Webhooks can be used to log events to a channel of your choice. This can be useful for keeping track of what is happening on your server.
Webhooks can be used to log events to a channel of your choice. This can be useful for keeping track of what is happening on your server.
Events that will be logged
- Creating a task
- Putting a task into the bin
- Restoring a task from the bin
- Deleting a task
- A task is repeated
- Task status changes
- Assigning a user/team
- Unassigning a user/team
- Changing the deadline of a task
- Commenting on a task
- Deleting a comment on a task
- Creating a project
- Deleting a project
- Renaming a project
- Moving a project to the bin
- Restoring a project from the bin
- Granting a permission
- Revoking a permission
- Applying a permission preset
- Creating a label
- Deleting a label
- Editing a label
- Creating a topic
- Putting a topic into the bin
- Restoring a topic from the bin
- Deleting a topic
- Renaming a topic
- Moving a topic to another project
- Creating a document
- Deleting a document
- Editing a document
- Moving a document to another topic
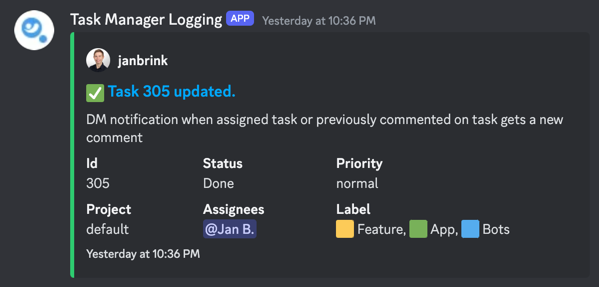
Task and ticket messages show the task name or ticket title in the webhook title. The numeric ID is still included in the message fields and JSON payload.
Log Levels
You can set the log level to one of the following:
Everything- Logs all eventsCreate & Delete- Logs creating, deleting events (task creation, project creation, task deletion, etc.) and permission changesPermissions only- Logs only permission changes (granting, revoking, applying permission presets)
Setting endpoint log levels
Each webhook endpoint has its own log level. Set it when you add the endpoint with /settings logging action:add, or update an existing endpoint with /settings logging action:update and the webhook autocomplete selector.
The older /settings log_level command only changes the default level used for new webhook endpoints when no endpoint level is provided. It does not change delivery for existing endpoints.
How to set up logging
Creating a webhook
Webhooks can only be created on Discord Desktop or Discord Web. You can not create webhooks on Discord Mobile.
- Go to Discord server settings: Click on the server name in the top left corner of the screen and select
Server Settings. - Go to the integrations tab: Click on the
Integrationstab in the left sidebar. - Create a webhook: Click on the
Create Webhookbutton and fill in the name and channel you want to log to. - Copy the webhook URL: Copy the webhook URL and save it somewhere. You will need it later.
Set up logging
Run the /settings logging command with action:add, a workspace-unique name, and the copied url. You can also set the endpoint format, modules, and log level from the same command.
Testing logging
The bot sends a test message to the webhook, after the url was set.
Project scope
When no project is specified, the endpoint receives matching events for the whole workspace. If you want to log only for a specific project, specify the project when adding the endpoint.
You can add more than one webhook endpoint to the same workspace or project. Matching global and project endpoints both receive the event.
Free workspaces include 3 logging webhook endpoints. Each paid seat adds 3 more webhook endpoints for the workspace.
Each webhook endpoint has its own log level. Use it when one destination should receive every event while another should only receive create/delete or permission changes.
Run /settings logging action:list to see webhook names. Use action:update with the webhook autocomplete selector to change one endpoint, or action:remove with the same selector to remove one endpoint without touching the others.
Webhook names are unique within a workspace because the Discord bot uses them to identify endpoints. Endpoint IDs are generated by Bnder and stay internal. The same name and capacity checks apply when administrators submit changes at the same time. Once saving succeeds, the endpoint is available immediately; the test message is sent afterward and does not change the save result.
When a project is deleted, webhook endpoints scoped only to that project receive the project-deleted event and are then removed.
Delivery status
The app shows delivery stats for each webhook endpoint, including total successful and failed sends. Each endpoint also shows the last five delivery attempts with the event, time, HTTP status when available, and the error returned by the receiver.
Webhook URLs stay hidden in this status view. If a delivery fails, check the receiver error first, then verify the endpoint URL and whether the destination service still accepts incoming webhooks.
Endpoint format and modules
Webhook endpoints can use Discord format or technical format. Discord format sends the normal embed message and includes object data in _data. Technical format sends event metadata and object data without the Discord embed wrapper.
Endpoints can also be limited to modules:
- Tasks
- Documents
- Tickets
- General workspace changes
- All events
Empty log messages
When the log messages appear empty, it is likely you have disabled the link preview for Discord. You can enable it by
going to User Settings > Text & Images > Embeds & Link Previews.
Difference between logging and event logs
You can get information about event logs here.
Logging is a feature that logs events to a channel of your choice. Event logs are a feature that logs events to a storage managed by bnder, which can not be modified or deleted by users.
Third-party services
You can set the webhook url to whatever service you want. But keep in mind that the service must support the Discord webhook format documented here.
When Discord format is used, the webhook request contains an additional _data field with the object data in JSON format. Technical format sends event metadata and object data directly, which is useful for third-party services that want to process events without parsing Discord embeds.